How to extract facial expressions, head pose, and gaze from any Youtube video
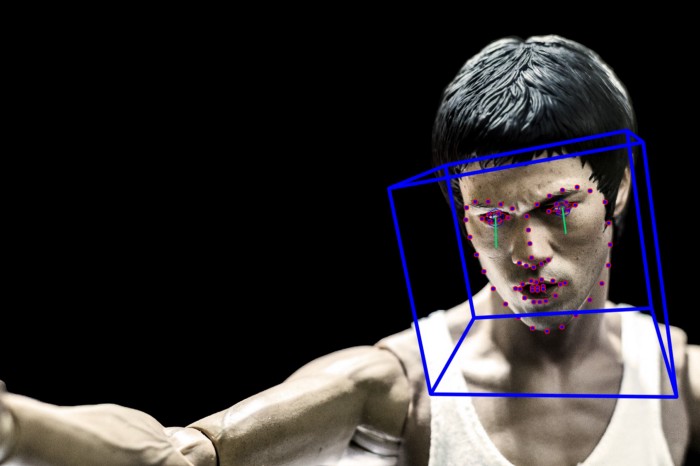
Photo by Fervent Jan on Unsplash
This post was also published in Towards Data Science at Medium
A tutorial using Google Colab & OpenFace to extract facial features from Youtube videos without installing a single program on your laptop.
How people feel, their thoughts, and their interests can be studied and analyzed by investigating people’s facial expressions, head pose, and gaze information. There are numerous companies and computer vision algorithms that help extract these facial features from face videos including Emotient and Affectiva (comparison of their algorithms here, here), but very few companies provide these services for free and most companies require users to purchase a subscription or pay per minutes of the video.
In this post, I share a free, easy-to-use, and robust alternative to paid services for facial feature extraction using OpenFace, a state of the art tool for facial action unit recognition, gaze estimation, facial landmark detection, and head pose estimation. Here I share instructions on how to use a Google Colab Jupyter notebook that allows you to setup OpenFace and extract facial features from any Youtube video without having to install a single package on your laptop.
Here is the link to the notebook!
Outline
- Setup
- Find a Youtube video to analyze.
- Process the video using OpenFace
- Visualize the results!
- Download the outputs.
1. Setup
You don’t need to install anything on your laptop, but you still need to install the OpenFace package on your Colab instance. Unfortunately, this part can take a while (~40 minutes) which is the perfect amount of time for you to binge watch some Youtube videos to figure out which one you want to extract facial features from. Oh, and you’ll probably need to have a Google account.
import os
from os.path import exists, join, basename, splitext

git_repo_url = 'https://github.com/TadasBaltrusaitis/OpenFace.git'
project_name = splitext(basename(git_repo_url))[0]
# clone openface
!git clone -q --depth 1 $git_repo_url

# install new CMake becaue of CUDA10
!wget -q https://cmake.org/files/v3.13/cmake-3.13.0-Linux-x86_64.tar.gz
!tar xfz cmake-3.13.0-Linux-x86_64.tar.gz --strip-components=1 -C /usr/local

# Get newest GCC
!sudo apt-get update
!sudo apt-get install build-essential
!sudo apt-get install g++-8

# install python dependencies
!pip install -q youtube-dl

# Finally, actually install OpenFace
!cd OpenFace && bash ./download_models.sh && sudo bash ./install.sh
2. Find a Youtube video to analyze.
Find a Youtube video you’d like to analyze. It could be a video with the face of one person or it could be faces of multiple individuals. Just be careful to avoid videos that have too small of a face which gives most algorithms a hard time to finding the face. In this tutorial, we will extract facial features from a short skit I did with my colleagues to pitch an app idea, TasteSpace, for Pioneer.app. The following code will show you the video of interest.
dfrom IPython.display import YouTubeVideo

# Change the Youtube_ID with the link to your group's video.
YOUTUBE_ID = 'XtA6FQz8BHQ'

YouTubeVideo(YOUTUBE_ID)
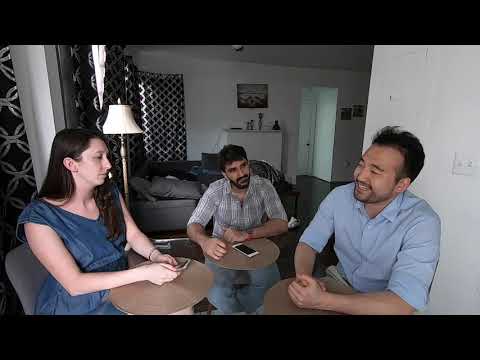
This is the video we will be working with.. We are describing a project called TasteSpace. Click the video to check it out!
The next few lines of code download the video and trim the first few seconds (10 seconds) of the video. This is just to save processing time so feel free remove the -t 10 flag on the fifth line if you want to process the whole video.
!rm -rf youtube.mp4
# download the youtube with the given ID
!youtube-dl -f 'bestvideo[ext=mp4]' --output "youtube.%(ext)s" https://www.youtube.com/watch?v=$YOUTUBE_ID
# cut the first 5 seconds
!ffmpeg -y -loglevel info -i youtube.mp4 -t 10 video.mp4
You can remove the “-t 10” flag if you’d like to extract features from the whole video (which would take longer).
3. Process the video using OpenFace
Now we will use FaceLandmarkVidMulti which can extract facial features from multiple faces simultaneously.
# clear any previous outputs.
!rm -rf processed
# detect poses on the these 10 seconds.
!./OpenFace/build/bin/FaceLandmarkVidMulti -f video.mp4 -out_dir processed
# convert the result into MP4
!ffmpeg -y -loglevel info -i processed/video.avi output.mp4
If you only have 1 face at a time in your video, then you could use FeatureExtraction instead or FaceLandmarkImg if you’d like to extract features from an image. Click here to see the full list of command line functions and their arguments and parameters.
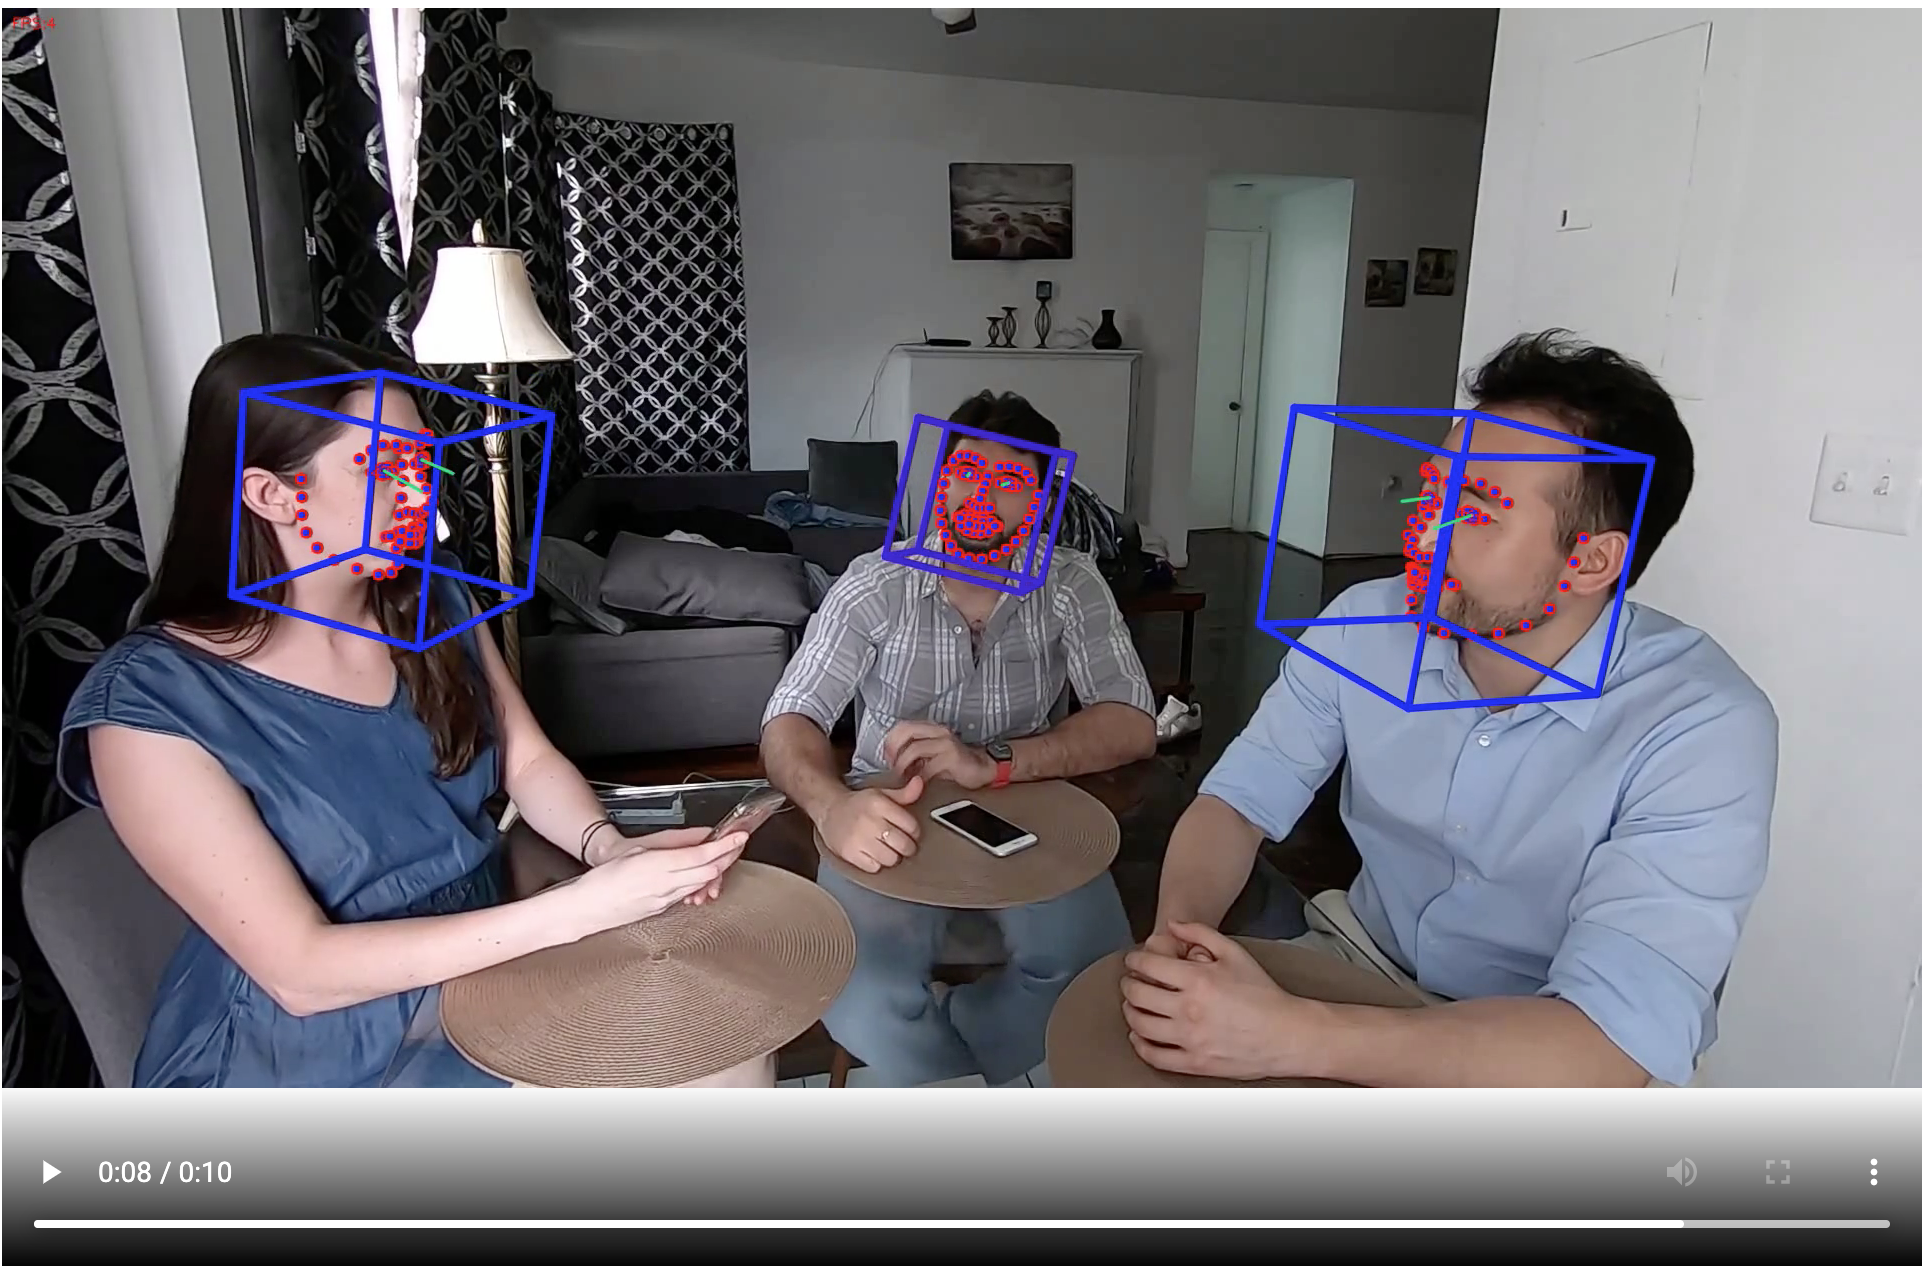
4. Visualize the results!
You can visualize the results with the following code where you can inspect right from the notebook if the outputs make sense.
def show_local_mp4_video(file_name, width=640, height=480):
  import io
  import base64
  from IPython.display import HTML
  video_encoded = base64.b64encode(io.open(file_name, 'rb').read())
  return HTML(data='''<video width="{0}" height="{1}" alt="test" controls>
                        <source src="data:video/mp4;base64,{2}" type="video/mp4" />
                      </video>'''.format(width, height, video_encoded.decode('ascii')))

show_local_mp4_video('output.mp4', width=960, height=720)
5. Download the outputs.
You can now download the extracted facial features by opening the Files tab on the left menu of your Colab notebook and Download the file in the folder processed/videos.csv.
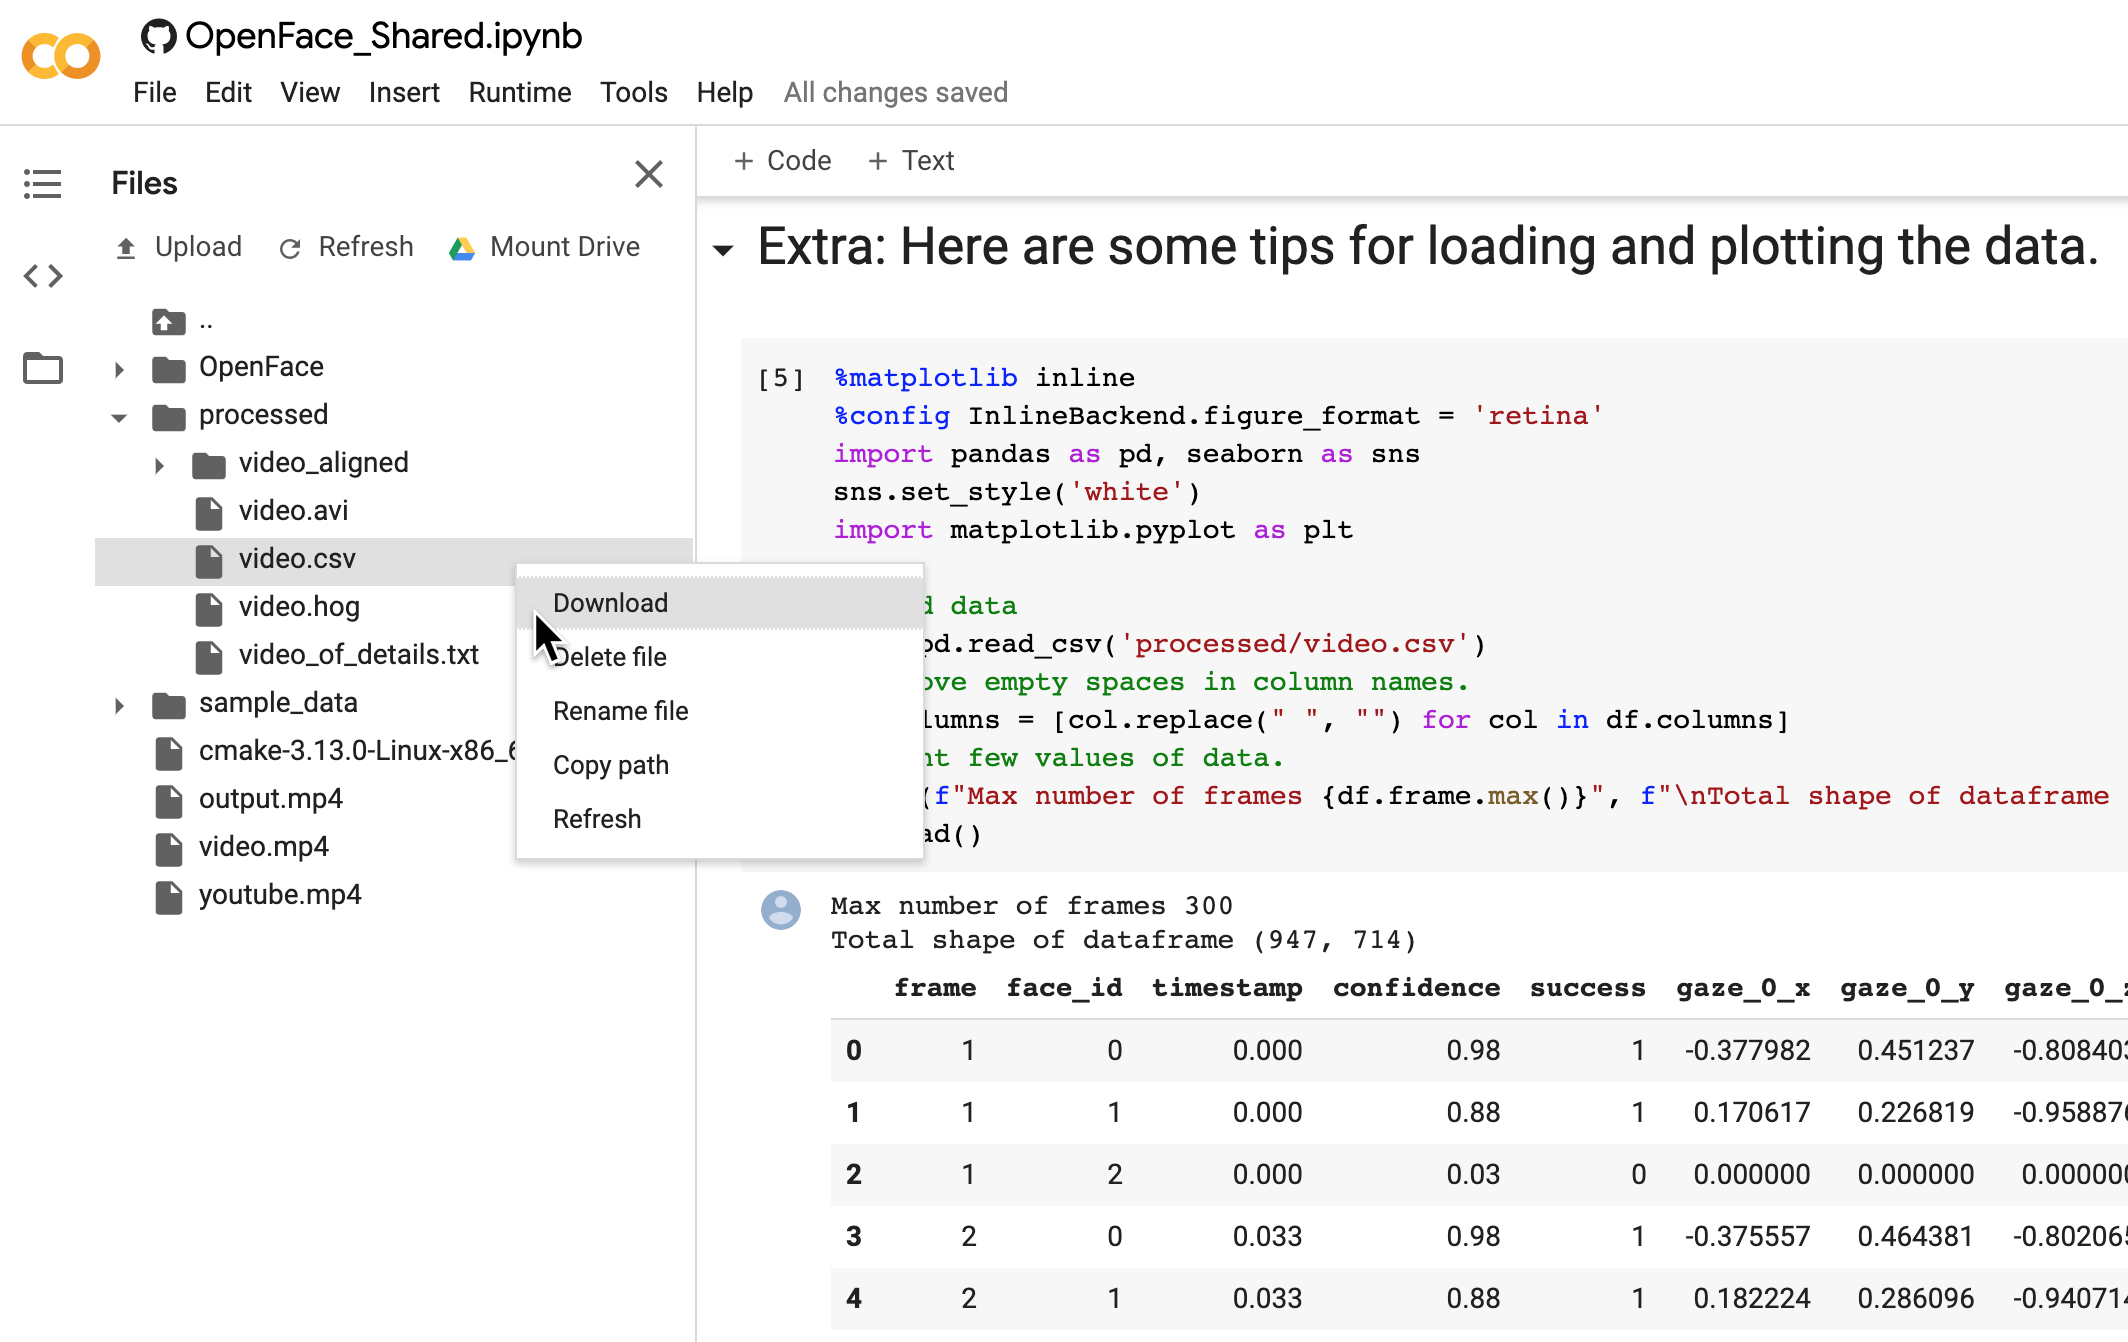
Expand the Files tab and Download the results.
The instantaneous phase synchrony measure is a great way to compute moment-to-moment synchrony between two signals without arbitrarily deciding the window size as done in rolling window correlations. If you’d like to know how instantaneous phase synchrony compares to windowed correlations, check out my earlier blog post here.
Conclusion
Hopefully, this was an interesting exercise on how you can use Google Colab and OpenFace to extract facial features from any Youtube video in a few minutes (after installation). If you are interested in learning more about how to analyze the synchrony between individuals in this kind of facial expression data, feel free to check out my previous post on how to do just that.
Extra credit
If you are still reading this, you might be interested in getting more info on how to handle the outputs of OpenFace, here are some additional code to get you started.
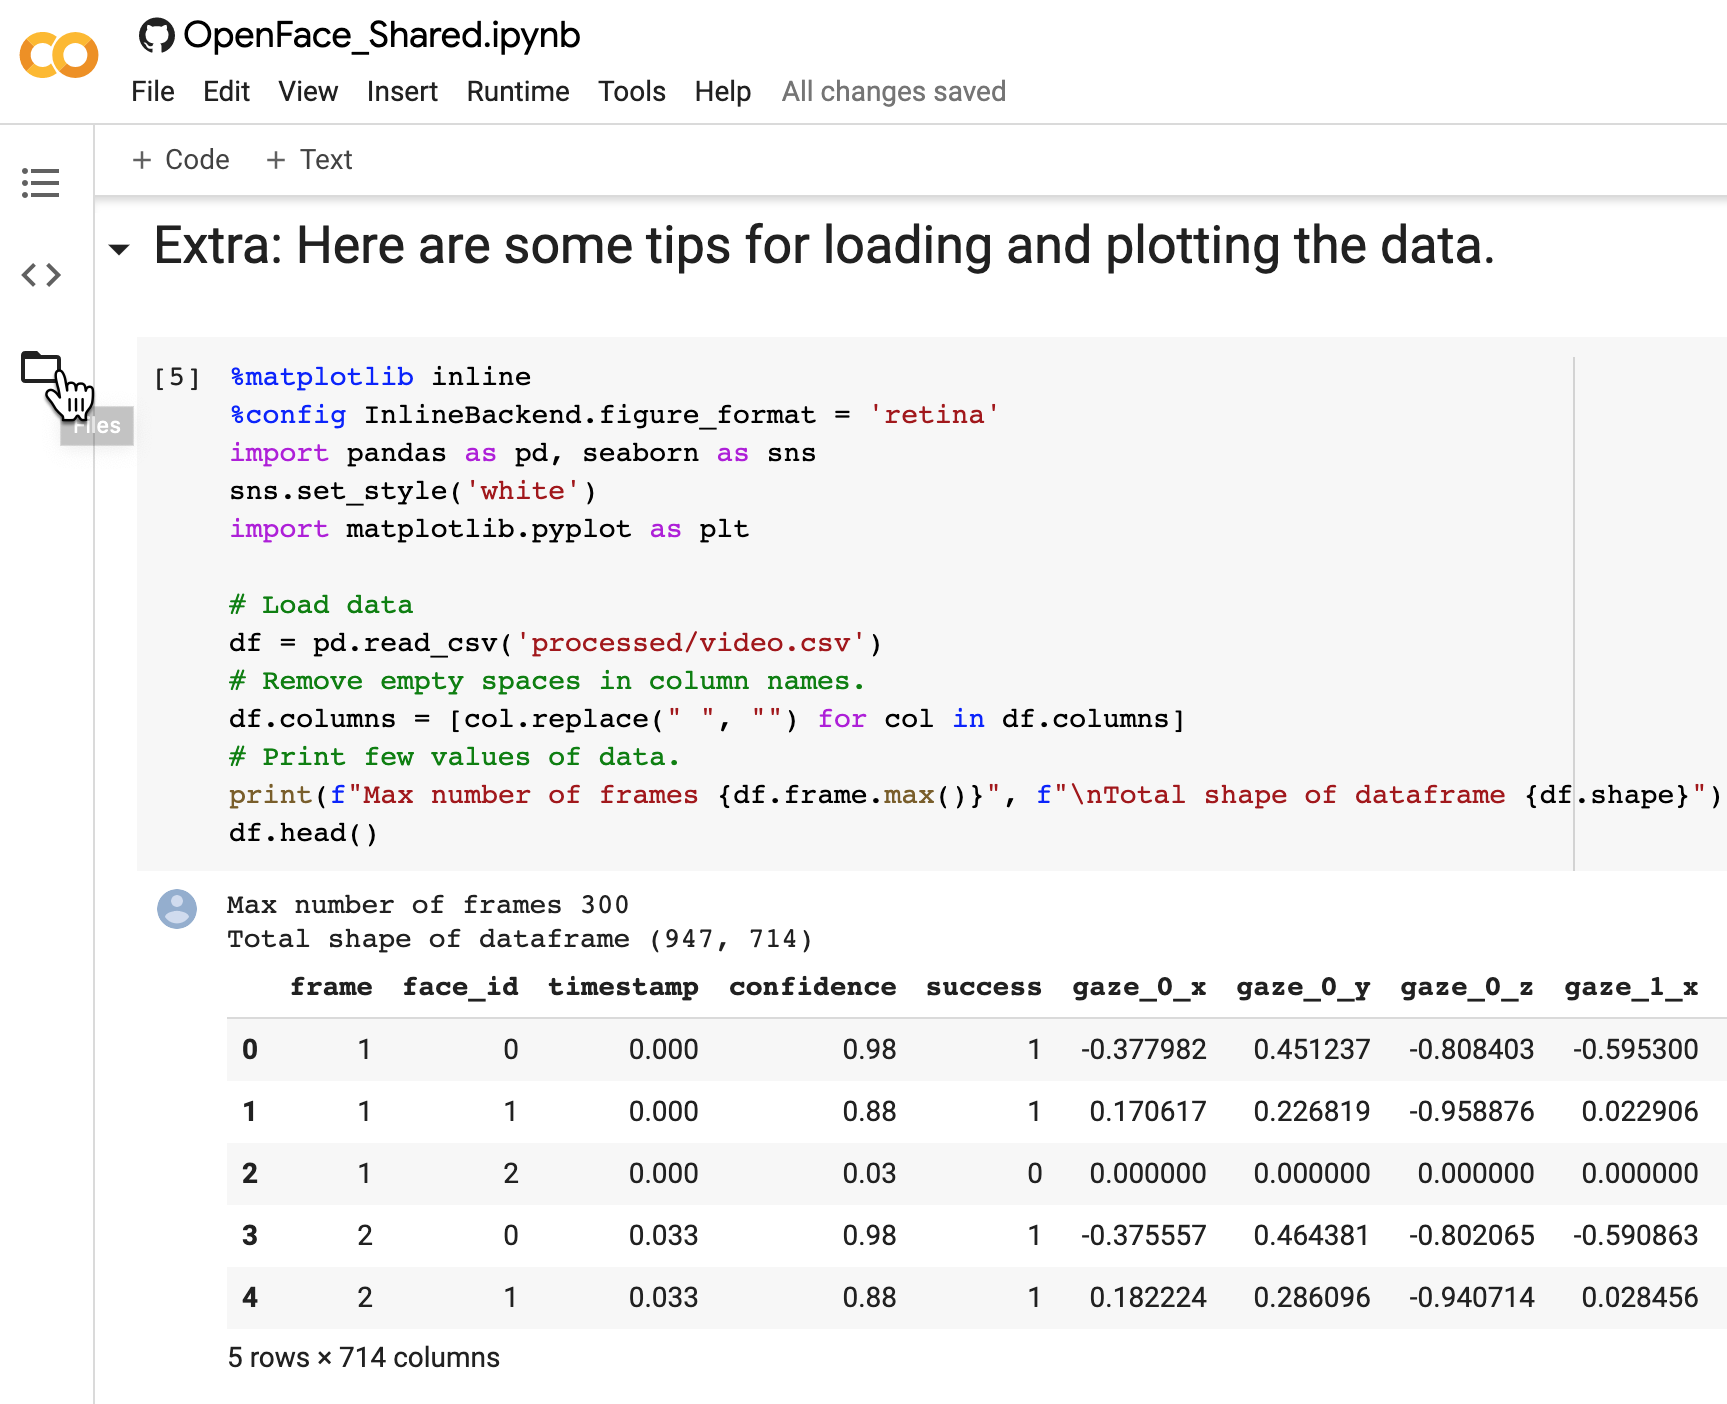
Loading the data
First, we’ll load the data into a Pandas dataframe, rename the columns to get rid of empty spaces, asses the shape of the dataframe, highest frame number of the data, and plot the head of the data.
%matplotlib inline
%config InlineBackend.figure_format = 'retina'
import pandas as pd, seaborn as sns
sns.set_style('white')
import matplotlib.pyplot as plt

# Load data
df = pd.read_csv('processed/video.csv')
# Remove empty spaces in column names.
df.columns = [col.replace(" ", "") for col in df.columns]
# Print few values of data.
print(f"Max number of frames {df.frame.max()}", f"\nTotal shape of dataframe {df.shape}")
df.head()
Counting number of unique individuals from video
You might notice column face_id which attempts to differentiate between individuals in the video.
# See how many unique faces there are
print("Number of unique faces: ", len(df.face_id.unique()), "\nList of face_id's: ", df.face_id.unique())
Looks like we get 4 unique faces instead of 3!
Average model confidence for detecting faces from the video
We can further assess what degree of confidence the algorithm had for detecting each face with the following function.
df.groupby('face_id').mean()['confidence']
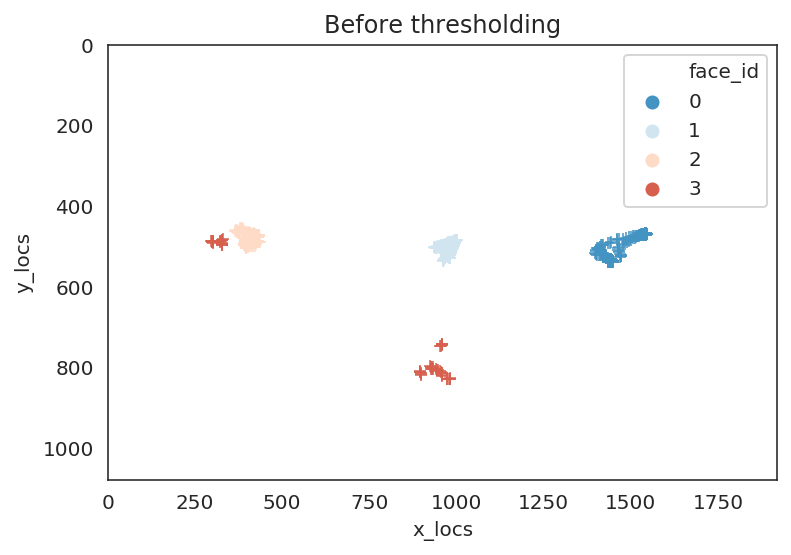
Visualize the location of faces from the video
We see that face_id==3 has the lowest confidence which is likely to be spurious faces that was detected. Let’s further check this by plotting the location of faces throughout the clip.
import re
x_regex_pat = re.compile(r'^x_[0-9]+$')
y_regex_pat = re.compile(r'^y_[0-9]+$')
x_locs = df.columns[df.columns.str.contains(x_regex_pat)]
y_locs = df.columns[df.columns.str.contains(y_regex_pat)]
palette = sns.color_palette("RdBu_r", 4)
avg_face_df = pd.DataFrame({'x_locs':df[x_locs].mean(axis=1), 'y_locs':df[y_locs].mean(axis=1), 'face_id': df.face_id})
ax = sns.scatterplot(x='x_locs', y='y_locs', hue = 'face_id', data=avg_face_df, marker="+", palette=palette)
ax.set(xlim=[0, 1920], ylim=[1080,0], title="Before thresholding");
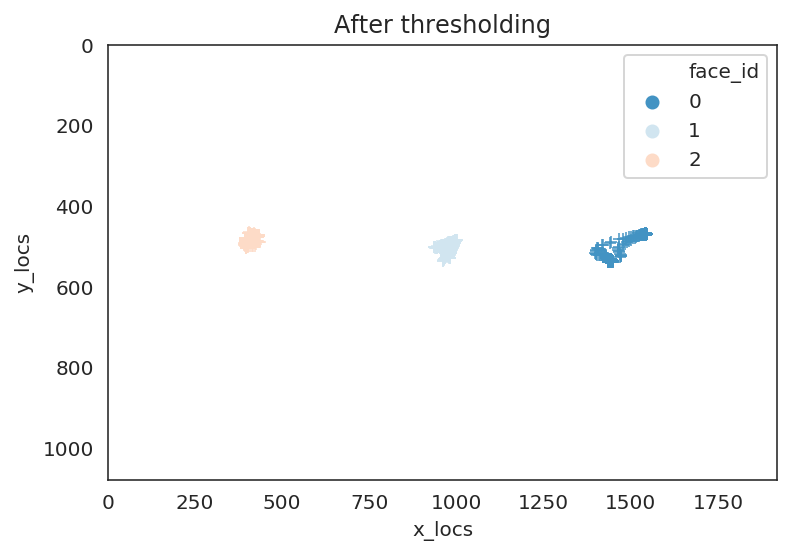
avg_face_df_conf = avg_face_df[df.confidence>=.80]
ax = sns.scatterplot(x='x_locs', y='y_locs', hue = 'face_id', data=avg_face_df_conf, marker="+", palette=palette[:3])
ax.set(xlim=[0, 1920], ylim=[1080,0], title="After thresholding");
We can see that in the plot to the left that indeed the face with face_id==3 was somewhere where a face did not exist. We can threshold the outputs based on an arbitrary confidence level (here we used 80%) and we can see in the lefthand plot that we got rid of the spurious face.
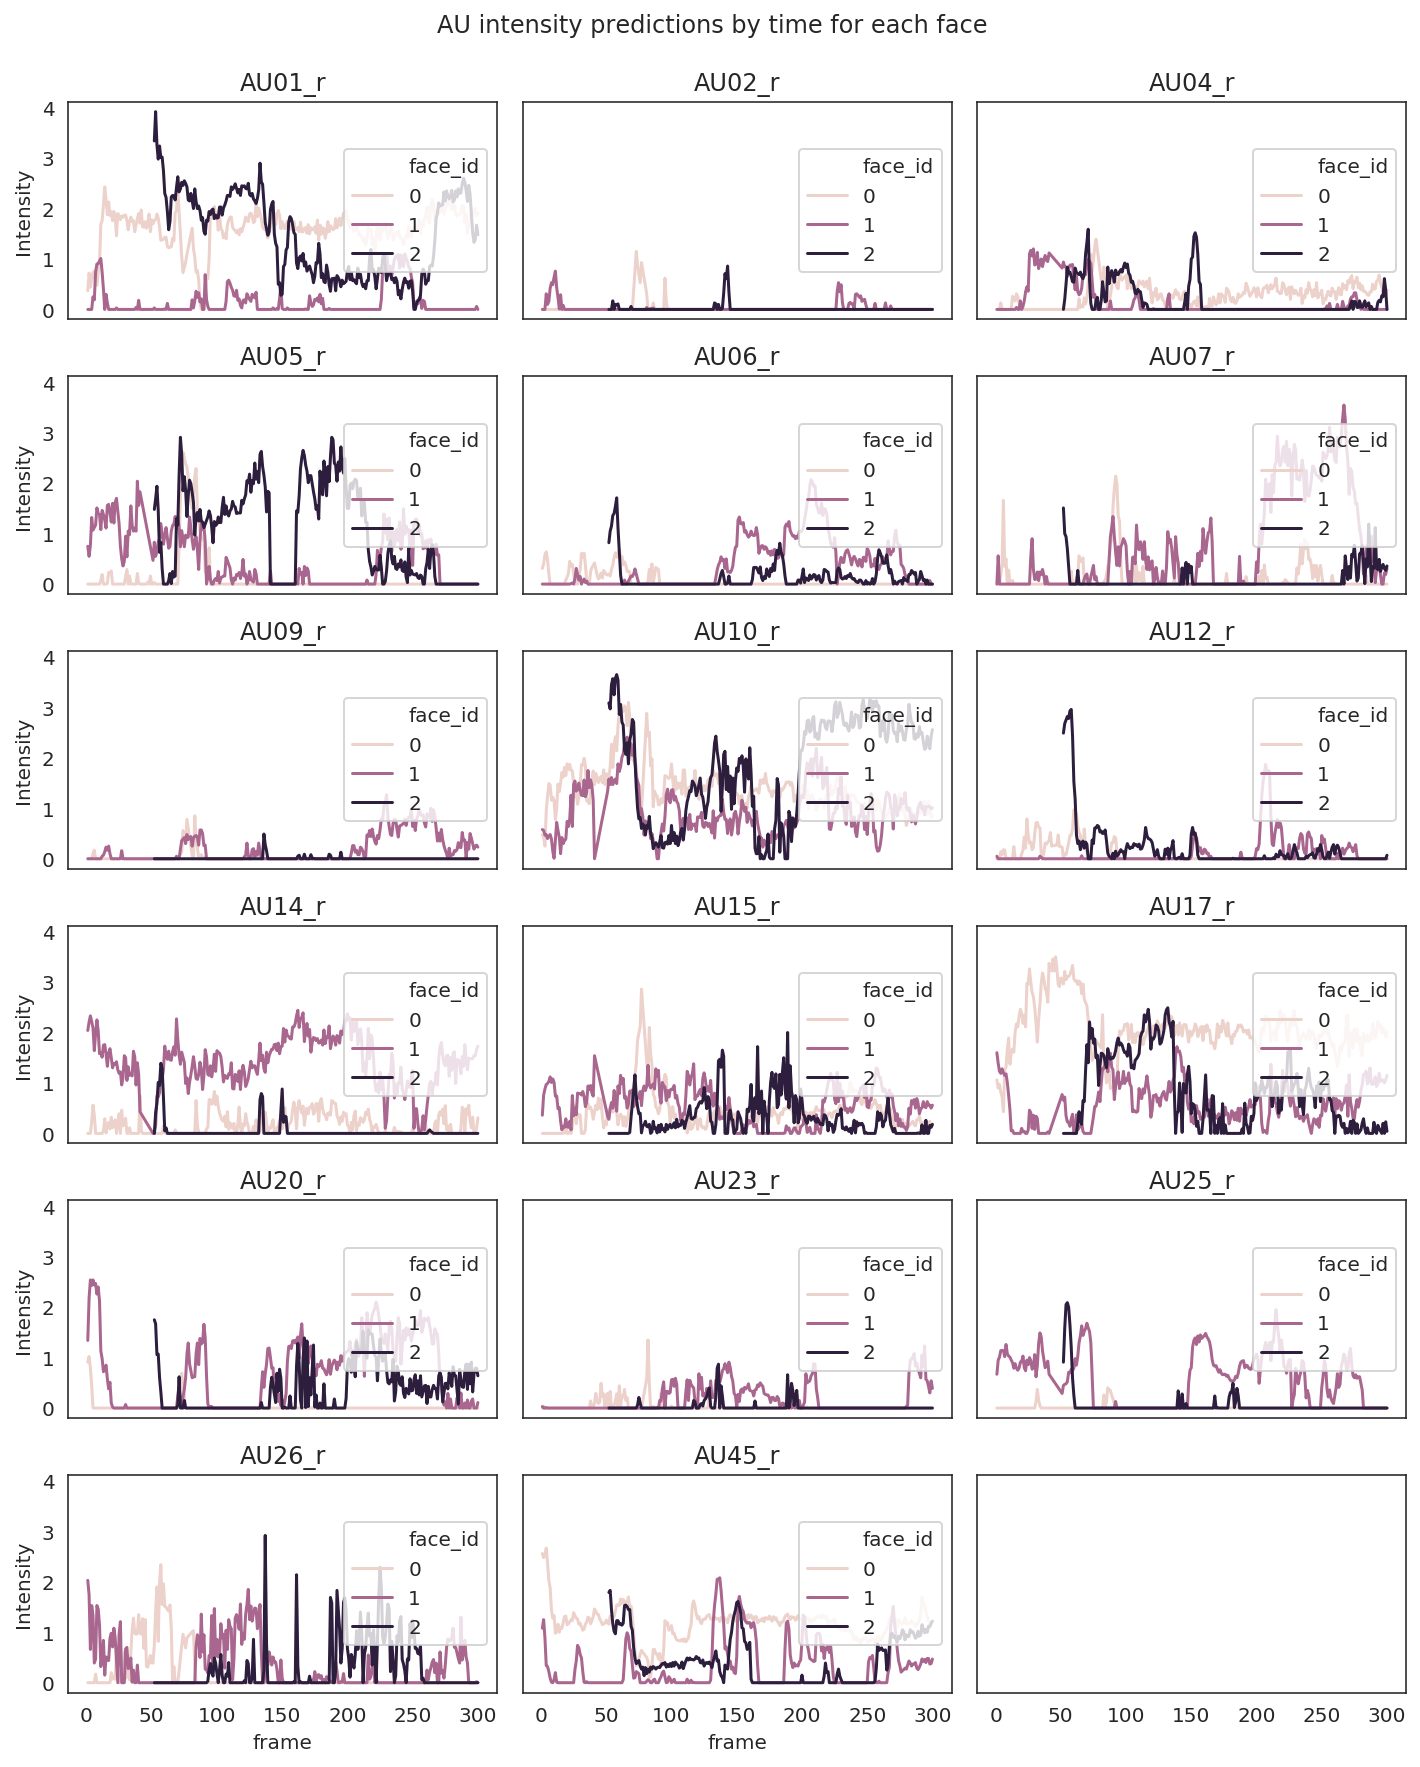
Analyze facial muscle movements over time
Now let’s plot what the trajectory of each action unit predictions look like over time for each face. Then we’ll print how similarly people were smiling (action unit 12) over time in the video.
# Threshold data by 80%
df_clean = df[df.confidence>=.80]
# Plot all Action Unit time series.
au_regex_pat = re.compile(r'^AU[0-9]+_r$')
au_columns = df.columns[df.columns.str.contains(au_regex_pat)]
print("List of AU columns:", au_columns)
f,axes = plt.subplots(6, 3, figsize=(10,12), sharex=True, sharey=True)
axes = axes.flatten()
for au_ix, au_col in enumerate(au_columns):
    sns.lineplot(x='frame', y=au_col, hue='face_id', data=df_clean, ax=axes[au_ix])
    axes[au_ix].set(title=au_col, ylabel='Intensity')
    axes[au_ix].legend(loc=5)
plt.suptitle("AU intensity predictions by time for each face", y=1.02)
plt.tight_layout()

# Let's compare how much AU12 (smiling) activity occurs at similar times across people.
df_clean.pivot(index='frame', columns='face_id', values='AU12_r').corr()
Correlation of smiling (AU12) for each pair of individuals.
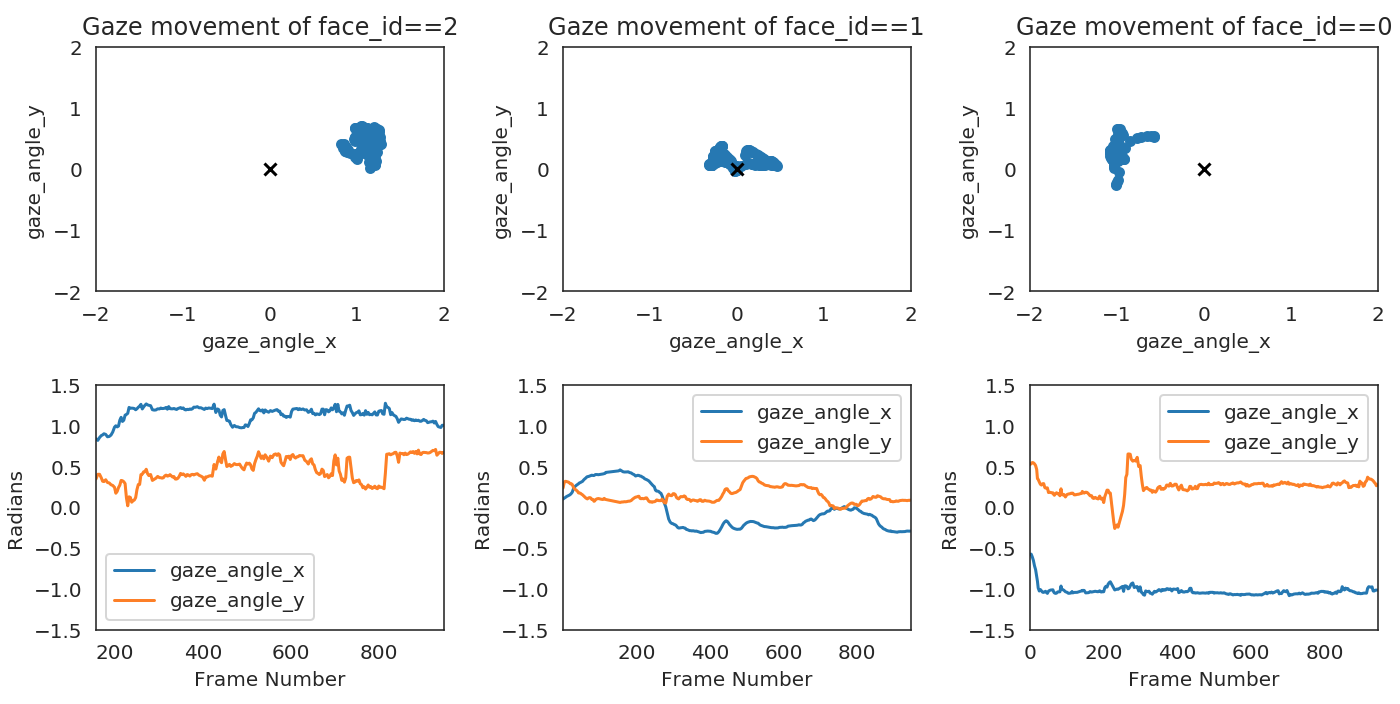
Analyze eye gaze over time
Lastly we can plot where each individual is looking at. This is probably not the best way to plot radians angles but you can still get a sense of where each face is looking. This passes the sanity check that the face on the left (face_id==2) looks mostly towards the right from the origin (0,0), face on the right (face_id==0) looks towards the left, and the face in the middle looks both ways.
If you’d like to learn more about the different outputs, I highly recommend reading more about what each output represents in the OpenFace wiki.
machine-learning python data-science OpenFace Colab tutorials